Copycat Starbucks pumpkin scones
There’s something magical about the combination of pumpkin, warm spices, and a flaky, tender scone that makes these Copycat Starbucks Pumpkin Scones the perfect fall treat. Whether you’re enjoying them for breakfast, a snack, or even dessert, these scones deliver all the flavor and comfort of the seasonal favorite—but in a way that’s gluten-free, dairy-free, and made from wholesome ingredients.
Ingredients
For the Scones:
- 3/4 cup tapioca starch
- 2/3 cup almond flour
- 1/2 cup coconut flour
- 3/4 - 1 cup coconut sugar or monk fruit sugar, adjust sweetness to taste
- 2 teaspoons baking powder
- 2-3 teaspoons pumpkin pie spice
- 1/2 cup pumpkin purée
- 3 tablespoons coconut milk
- 2 large egg yolks
- 1/2 cup non-hydrogenated palm oil shortening or softened coconut oil
For the Glaze:
- 1/4 cup coconut butter
- 1/4 cup maple syrup
- 1/4 cup coconut milk
For the Pumpkin Drizzle:
- 1/4 cup coconut butter
- 1 tablespoon pumpkin purée
- 1 teaspoon pumpkin pie spice
- 4 tablespoons coconut milk
Instructions
Step 1: Preheat & Prepare
- Preheat your oven to 365°F (185°C) and line a baking sheet with parchment paper. This will help prevent the scones from sticking and make cleanup easy.
Step 2: Mix the Dry Ingredients
- In a large bowl, whisk together the tapioca starch, almond flour, coconut flour, sugar, pumpkin pie spice, and baking powder. This ensures that all of the dry ingredients are well combined before adding the wet ingredients.
Step 3: Cut in the Shortening or Coconut Oil
- Add the palm oil shortening or softened coconut oil to the dry ingredients. Use a fork to cut the fat into the dry mixture until it resembles coarse crumbs. This step helps create that flaky, tender texture we all love in scones.
Step 4: Mix the Wet Ingredients
- In a separate bowl, combine the pumpkin purée, coconut milk, and egg yolks. Stir until smooth. Then, pour the wet ingredients into the dry mixture and stir until everything is well combined, forming a dough. If the dough seems too sticky, let it chill in the refrigerator for about 15 minutes to firm up.
Step 5: Shape the Scones
- Turn the dough out onto the parchment-lined baking sheet and shape it into a large, round disc about 3/4 inch thick and 7 inches in diameter. Using a sharp knife or bench scraper, cut the disc into 8 equal triangles. Space the scones out about 1 inch apart on the baking sheet to allow them room to rise and spread slightly while baking.
Step 6: Bake the Scones
- Bake the scones for 20 minutes, or until the tops are set and the edges are golden brown. The scones should be firm but not overly hard. Once baked, remove them from the oven and let them cool on the baking sheet while you prepare the glaze and pumpkin drizzle.
Step 7: Prepare the Glaze
- While the scones are cooling, prepare the glaze by melting the coconut butter in the microwave until softened. In a small bowl, whisk together the melted coconut butter, coconut milk, and maple syrup until smooth and creamy. If the glaze is too thick, you can add a little more coconut milk to reach your desired consistency.
Step 8: Prepare the Pumpkin Drizzle
- For the pumpkin drizzle, stir together the coconut butter, pumpkin purée, pumpkin pie spice, and coconut milk until you have a thick but smooth mixture. If needed, adjust the coconut milk to reach a piping consistency.
Step 9: Glaze & Drizzle
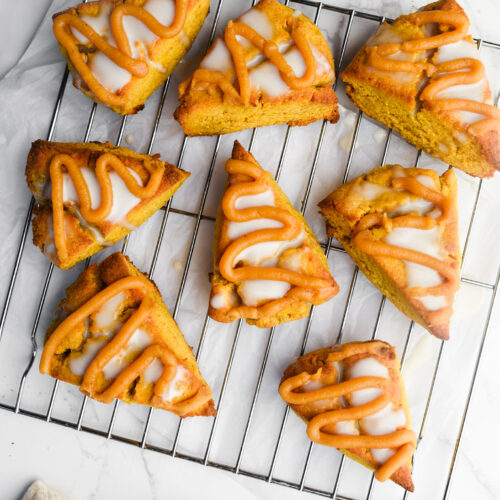
- Once the scones have cooled slightly, drizzle the coconut glaze over the tops of the scones. You can use a spoon or a small piping bag for a neater look. After the glaze has set for a few minutes, pipe or drizzle the pumpkin icing on top of the glaze in lines or zigzags for a beautiful finish.
Step 10: Serve and Enjoy!
- Once the glaze and pumpkin drizzle have set, your scones are ready to enjoy! These scones are best served slightly warm, so you can really savor the soft texture and rich flavors of pumpkin, spice, and coconut. Pair them with a hot cup of coffee or tea for the ultimate fall experience.
- If you have leftovers (though that’s unlikely!), store them in an airtight container at room temperature for up to 2 days. You can also refrigerate them for longer freshness—just let them come to room temperature or warm them in the microwave before serving.
Tried this recipe?Let us know how it was!